In this guide, we’ll show you how to clear the cart automatically after placing an order on WooCommerce using a PHP code snippet. By implementing this code snippet in the appropriate location, you can ensure a clean slate for your customers, promoting an organized and hassle-free shopping experience.
Empty orders in WooCommerce can be frustrating for both customers and businesses. By implementing simple PHP snippets, you can ensure that orders are not placed without any products. This quick guide will walk you through the steps to validate carts and delete empty orders, improving the overall user experience and order management efficiency.
1. Disabling Checkout for Empty Carts:
To prevent orders without products, use this PHP snippet to disable the checkout button if the cart is empty:
add_filter('woocommerce_is_purchasable', 'disable_checkout_on_empty_cart', 10, 2);
function disable_checkout_on_empty_cart($is_purchasable, $product) {
    if (WC()->cart->is_empty()) {
        $is_purchasable = false;
    }
    return $is_purchasable;
}
2. Deleting Orders without Products:
If an order is placed without any products, it’s best to delete it automatically. Use this PHP snippet to delete orders without products:
add_action('woocommerce_new_order', 'delete_empty_orders', 10, 1);
function delete_empty_orders($order_id) {
    $order = wc_get_order($order_id);
    if (count($order->get_items()) === 0) {
        $order->delete(true);
    }
}
By implementing these PHP snippets, you can ensure that empty orders are prevented and efficiently managed in WooCommerce. Disabling checkout for empty carts improves the user experience by prompting customers to add products before proceeding. Deleting orders without products keeps your order management streamlined and clutter-free.
Remember, validating carts and deleting empty orders are crucial steps to maintain a seamless customer journey in WooCommerce.
Adding a new tab with product meta on the single product page in WooCommerce can be a great way to provide additional information about your products to your customers. In this post, we’ll walk you through the steps to add a new tab with product meta on the single product page in WooCommerce.
Step 1: Open functions.php To add a new tab with product meta on the single product page in WooCommerce, you’ll need to open your theme’s functions.php file. This file is located in your theme’s directory and contains all of the functions that your theme uses.
Step 2: Add the Code Once you’ve opened your functions.php file, you can add the following code to add a new tab with product meta on the single product page:
This code adds a new tab called “New Tab” with product meta information such as SKU, weight, and dimensions. You can customize this code to fit your specific needs.
Step 3: Save and Test Once you’ve added the code to your functions.php file, save the file and test your new tab. You should now see a new tab on the single product page in WooCommerce with the product meta information you specified.
We hope you found this post helpful. If you have any questions or comments, please feel free to leave them below!
One common functionality that store owners often need is to retrieve the quantity of a particular product in a customer’s cart. In this post, we’ll walk you through the steps to achieve this using WooCommerce hooks and functions. Let’s dive in!
Step 1: Identify the product to retrieve its quantity
To begin with, you need to know the product ID or product SKU for the item whose quantity you want to retrieve. You can find this information in the WooCommerce Products section in your WordPress dashboard. Once you have the product ID or SKU, you can proceed to the next step.
Step 2: Create a custom function to get the product quantity
Now, you need to create a custom function that will retrieve the quantity of the specified product from the cart. You can add this function to your theme’s functions.php file or in a custom plugin file. Here’s a sample code snippet:
function get_product_quantity_from_cart( $product_id ) {
  $quantity = 0;

  // Check if the cart is not empty
  if ( ! WC()->cart->is_empty() ) {
    // Loop through the cart items
    foreach ( WC()->cart->get_cart() as $cart_item ) {
      // Check if the current cart item matches the specified product ID
      if ( $cart_item['product_id'] == $product_id ) {
        // Update the quantity
        $quantity = $cart_item['quantity'];
        break;
      }
    }
  }

  return $quantity;
}
This function checks if the WooCommerce cart is not empty and then loops through the cart items. If the product ID matches the specified product, it retrieves the quantity and breaks the loop.
Step 3: Use the custom function in your theme or plugin
Now that you have the custom function, you can use it in your theme or plugin to display the quantity of the specified product in the cart. For example, you can call the function like this:
$product_id = 123; // Replace with your product ID
$quantity = get_product_quantity_from_cart( $product_id );
echo 'The quantity of product ID ' . $product_id . ' in the cart is: ' . $quantity;
This will output the quantity of the specified product in the cart.
Conclusion:
Retrieving the quantity of a product in the WooCommerce cart is a straightforward process. By creating a custom function and using it in your theme or plugin, you can efficiently access this information and use it for various purposes like displaying stock availability, offering dynamic discounts, or managing shipping options. With a bit of creativity, you can customize your WooCommerce store to better serve your customers and improve their shopping experience.
Modify Shipping Methods Programatically in Woocommerce is normal for any E-Commerce website build on WordPress using Woocomemrce. A lot of people gets confused when it comes to use woocommerce_package_rates filter on woocommerce to change shipping methods conditionally. I was one of them too. But woocommerce_package_rates do all stuff required to modify/remove shipping methods programatically.
Paste this code in theme_dir/functions.php
/**
  * Free Shipping if total is more then 200 USD excluding Coupons, Taxes or any other fees.
  *
  **/
add_filter( 'woocommerce_package_rates',  'modify_shipping_rate', 15, 2 );
function modify_shipping_rate( $available_shipping_methods, $package ){
    global $woocmmerce;

    // Cart Subtotal
    $total_coast = WC()->cart->get_cart_contents_total();
    if( $total_coast >= 200 ){
        // "free_shipping:1" is the Shipping Method ID

        if(isset($available_shipping_methods['free_shipping:1'])) {
            // Change Cost of Shipping Method
            $available_shipping_methods['free_shipping:1']->cost = 0;

            // Remove Shipping Method
            unset($available_shipping_methods['local_pickup:1']);
        }
    }
    return $available_shipping_methods;
}
Remember to clear cart and add products again, after adding woocommerce_package_rates filter.
You will have to change Shipping Method IDs according to your conditions. In this code it is free_shipping:1.
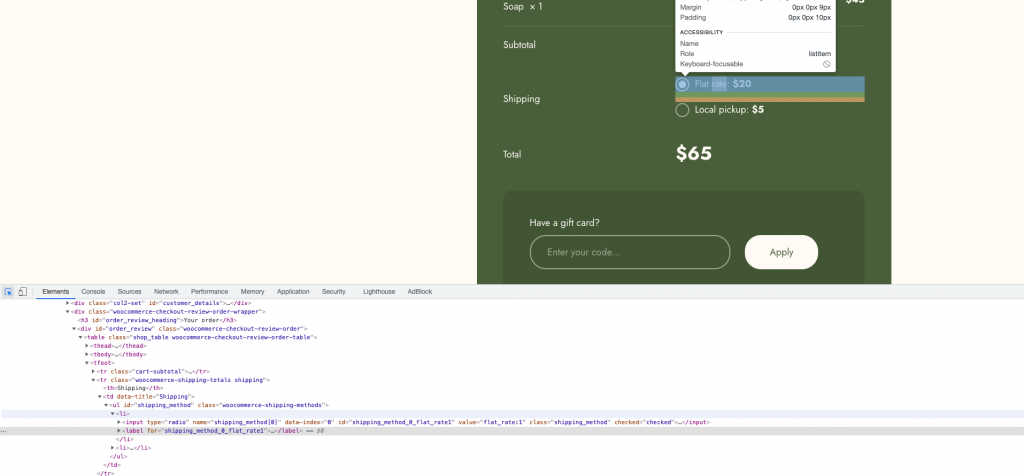
Find Shipping Methods ID
Inspect Element on the Shipping Method.
flat_rate:1 will be the Shipping Method ID as shown in the screenshot.
Modify Shipping Methods Programatically in Woocommerce is a simple method to complete your needs easily with less load
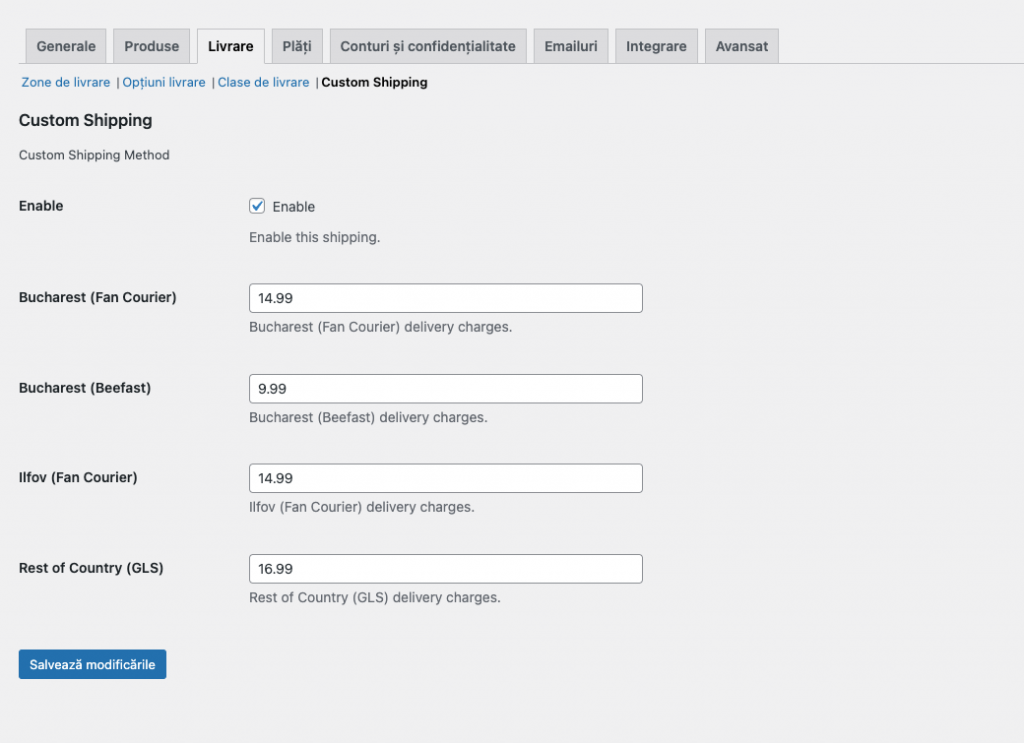
Test Custom Shipping Methods by Adding Products. (Remember to change country code in plugin on line no. 50 or remove it if you’re going to use it for all countries).
You can modify the code according to your needs.
Shipping Method Settings
Creating Custom Shipping Methods for Woocommerce is super easy. Still, If you are stuck anywhere feel free to comment on the post, I will reply back with the solution ASAP.
Litespeed Cache is one of the best caching plugin on wordpress but sometimes it makes things worse on wordpress website. On this post we are going to talk about how we can make it work with woocommerce.
Known Issues
Cart Items Count getting cached.
Add to Cart using Ajax doesn’t work.
Woocommerce Pages getting cached (like My Account, Cart, Checkout and Thank You Page).
Fix Cart Items Count getting Cached
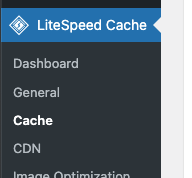
Go to Litespeed Cache (Dashboard) >> Cache
Litespeed Cache Menu on Dashboard
Open Excludes Tab and Scroll down to “Do Not Cache Cookies” Field
Write “woocommerce_items_in_cart” in the Field and Clear Cache
Do Not Cache Cookies Field
Fix Add to Cart using Ajax
Go to Litespeed Cache (Dashboard) >> Cache
Disable Cache Rest API
Rest API Option
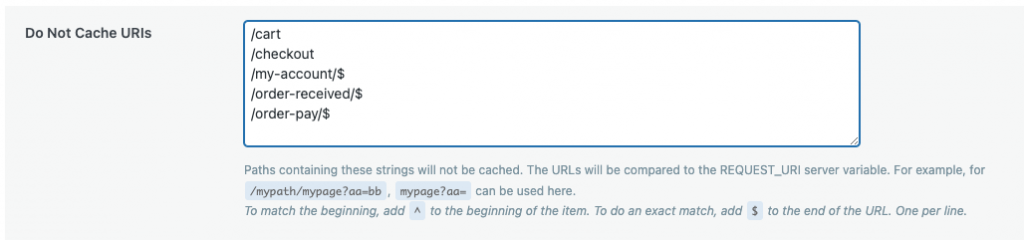
Fix Woocommerce Pages
Go to Litespeed Cache (Dashboard) >> Cache
Open Excludes Tab and Scroll down to “Do Not Cache URIs” Field